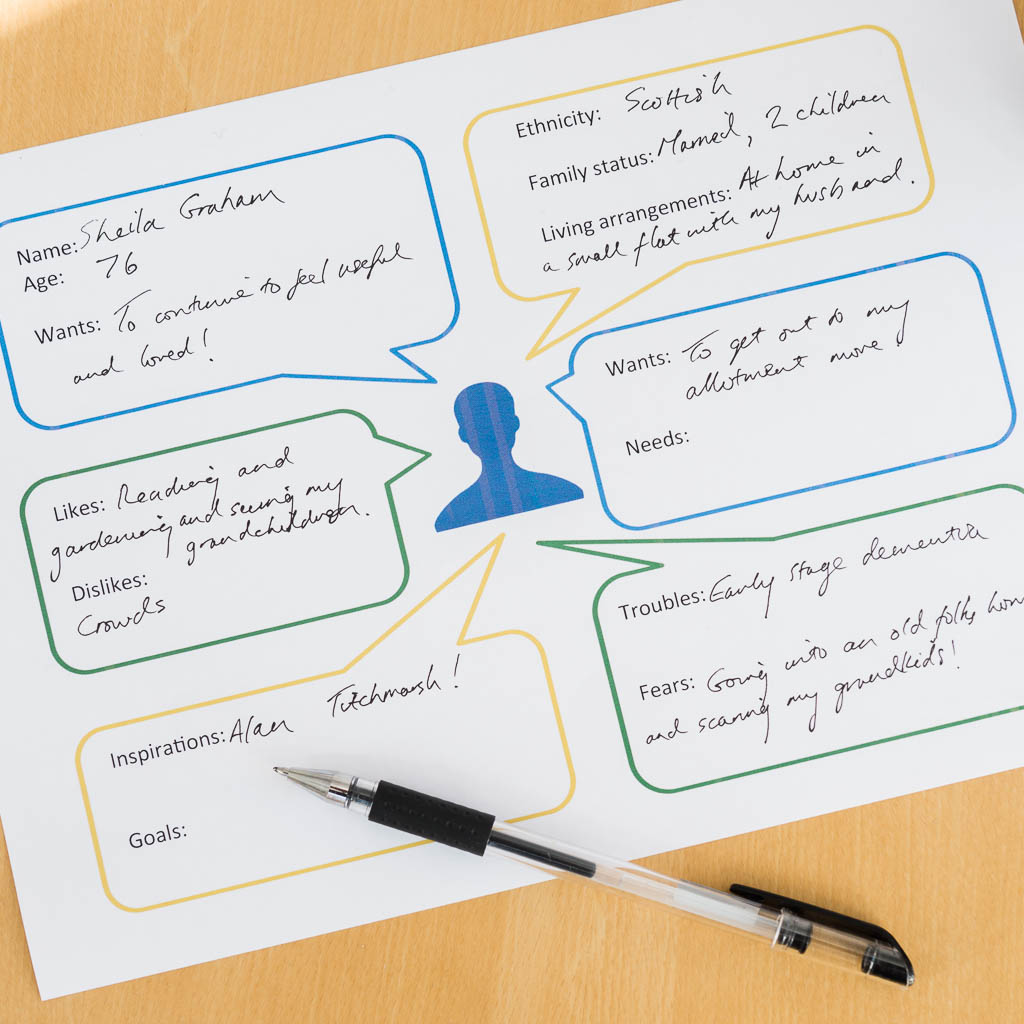
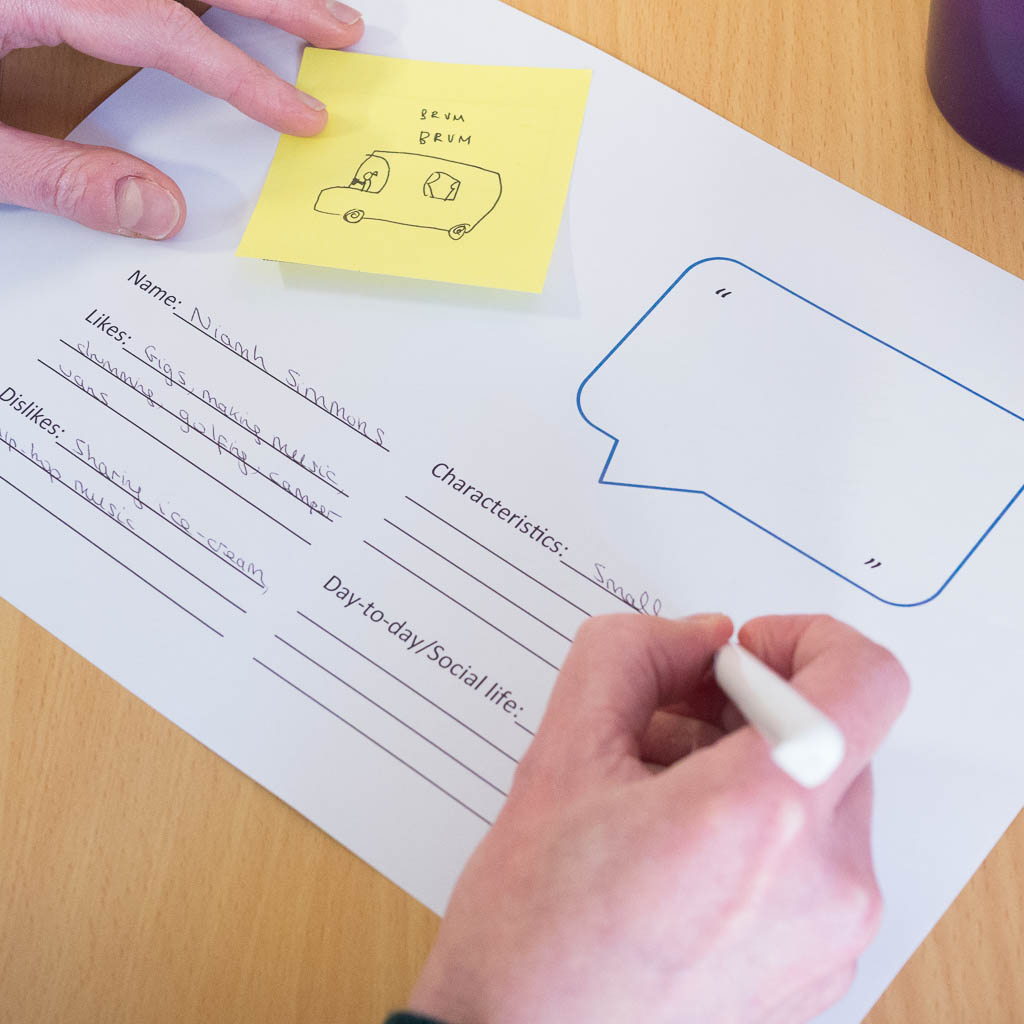
Tools

The Hospital to Home toolkit gathers together ten tools that can be used to enable people to understand each others' perspectives and to move towards co-designing solutions together.

We used these tools in the Hospital to Home project while working with older people and practitioners. However, we're sharing them here in an editable format so that you can adapt them to suit your needs and whoever you are working with.

The toolkit takes the form of a PowerPoint template – you'll find the download link below. The PowerPoint format makes it easy for you to edit and revise the tools as you require, and instructions for using each tool are included as notes with every slide.

What are the tools?

Download and adapt the tools…

We moulded these tools to be used in the Hospital to Home workshops, but their design is in no way set in stone.

Please do play about with them and adapt them to suit the needs of your work and those you are working with.

Download the toolkit

Rogues gallery

An ice-breaker to help you:

  • Capture information about the people in your group
  • Enable sharing across people in the group
  • Encourage people to share information about themselves that is broader than just their job role / job title

At what stage of the design process is this tool most useful?

Discover.

What can this tool be used for?

To enable people to work together effectively, it is crucial that they take time to get to know each other.

How do you use it?

  1. Ask each member to complete a blank form.
  2. Capture what members of the group look like by taking photos or asking them to draw themselves.
  3. Place the group into pairs.
  4. Ask them to introduce themselves to their partners using their completed forms for reference (10 minutes each).
  5. Then ask each person to take it in turns to introduce their partners to the larger group.
  6. Place the completed worksheets on the wall for reference.
  7. Bring the completed worksheets to future meetings for reference.
Rogues gallery

Conversation reflections

A tool for supporting people to see things from different perspectives.

At what stage of the design process is this tool most useful?

Discover.

What can this tool be used for?

This is a useful tool for enabling people to:

  • Capture the thoughts and dialogue between different groups of people (in this case, through a transition phase)
  • Help people to reflect on their previous conversations, feelings and experiences of a process

How do you use it?

  1. Thinking about a particular situation [in which you have received or provided care], use a blank piece of paper to note down some of the conversations you had with others and/or the internal thoughts you may have had yourself.
  2. Think about your role in each stage of this situation:
    • Did you feel involved in each stage?
    • How did this make you feel?
    • Who did you speak to?
    • How did they make you feel?
    • Where you left with any questions you didn’t ask?
  3. Each section of the blank worksheets represents one conversation you had and your related thoughts at the time.
  4. Complete the worksheets to tell your story about the situation.
  5. In the speech bubbles write a snap shot of the conversations you had with each person. For example, this may be the questions you asked and their responses
  6. In the thought bubbles write how you felt, things that you thought but did not say or questions you were left wanting to ask.
  7. Use the completed worksheets to discuss your conversations with the group.

Outcomes of using this tool

We anticipate that this tool enables people to reflect on, and understand the varied perspectives of the topic held by those in the group.

rmP10504882016

Pathway mapping

A way to reflect the stages of a process.

At what stage of the design process is this tool most useful?

Discover, Define, Develop.

What can this tool be used for?

This is a useful process to:

  • Help people understand other’s perspectives of the existing pathway
  • Enable people to discuss the barriers in the existing pathway
  • Enable people to start to discuss solutions to these barriers

How do you use it?

Ask the group to think about the current situation you are hoping to design solutions for.

For example you may discuss the following:

  • There are issues with the pathway from hospital to home for older people:
    • Older people can be delayed at the point of discharge
    • Older people can be readmitted to hospital following discharge
  • There are opportunities for improvement:
    • Health and Social Care are integrating
    • Third sector and community based services are available to support the pathway from hospital to home

Current Situation

Ask the group to work through the following steps to create a picture of the pathway from their perspective:

  • Use the materials provided to map the different services in the pathway
  • Highlight what some of the barriers and enablers may be. Note how these relate to and affect one another other
  • Show the people involved in the pathway at each stage (e.g. person using the service, family, informal carer, health and social care, community services and so on)

Possible Solutions

Ask the group to work through the following steps to begin designing solutions to the barriers they have identified:

  • Redesign the pathway to resolve existing barriers
  • Who would need to be involved to make these changes?
  • What is missing from the existing pathway?
  • Highlight the positives in your new pathway (note how they relate to one another)
  • Are there still issues in the pathway? Why can’t they be resolved? Highlight these

Outcomes of using this tool

We anticipate that this tool enables greater awareness of the different stages of moving through a pathway

rmP10504842016

Experience mapping

This activity helps people to highlight their experiences during a process they were part of.

At what stage of the design process is this tool most useful?

Discover, Define.

What can this tool be used for?

This tool can be helpful to:

  • Capture individual experience of care pathways and provisions
  • Enable people to share and visualise their experiences
  • Help practitioners understand the pathway from the perspective of those they support

How do you use it?

  1. Using the blank worksheet, think about the highs and lows concerned with a hospital admission, stay and discharge. Use your personal experience to tell a story from your perspective.
  2. Map your experience along the timeline by drawing a line that illustrates how you feel at different stages. Annotate this line to detail what was happening at each stage.
  3. Now draw a line that represents the level of care and support you were receiving at each stage. Annotate this line to detail who was providing the support. For example, you may have one line that shows a ‘low’ when you fall but another line that shows a ‘high’ because the ambulance crew offered great support at the same stage.

Outcomes of using this tool

We anticipate that this tool enables greater awareness of the different experiences of moving through a pathway.

rmP10504912016

LEGO Serious Play

Using physical objects to deepen understanding of a problem.

At what stage of the design process is this tool most useful?

Discover, Define, Develop.

What can this tool be used for?

  • Visualise what each other is thinking and describing
  • Create more effective dialogue
  • Develop a wider range of possible solutions to the problem being discussed
  • Aid discussion about the context and system in which you are working

How do you use it?

Ask your team to think creatively about the problem you are discussing. Prompt the group with questions to help them generate ideas. For example:

  • Can they visualise the problem?
  • How does it affect the context?
  • Who is affected by the problem?
  • How can the problem be resolved?
  • What would a resolution look like?
  • Who would this resolution involve?

Outcomes of using this tool

We anticipate that this tool enables people to see issues in a different light and therefore engage different conversations.

rmP10505042016

Personas

An approach to include the views and experiences of a person who is not always able to engage in the process you are working through.

At what stage of the design process is this tool most useful?

Discover.

What can this tool be used for?

Personas can be useful to:

  • Act as a stimulus for idea generation
  • Refer to throughout the project duration
  • Keep ideas person-centred
  • See things from a different perspective
  • Assist decision making by maintaining a focus on the person

How do you use it?

Consider a person that you have worked with in the past year who is involved in your service. Record the following details about this person:

  • A name and picture (drawing)
  • Demographics (age, ethnicity, family status, etc)
  • Their likes/dislikes
  • Their wants/needs
  • What inspires them/their goals
  • What troubles them/their fears
  • Repeat this process many times

If you are working in a co-design team, you could use these questions to co-create a persona alongside the other group members.

Outcomes of using this tool

We anticipate that using personas can improve reflection and support person-centred conversations.

rmP10504992016

Problem ranking

A way to help the group reach consensus on the problems to be taken forward, and keep focused on the key issues.

At what stage of the design process is this tool most useful?

Define.

What can this tool be used for?

Use this tool in your group to:

  • Gather an overview of the problems that are most important to the group
  • Narrow problems down
  • Establish why some problems are more important than others
  • Enable everyone to have their say

How do you use it?

  • Use the blank sheet individually to record the problems the group have identified
  • Think about what you thought was the most important problem
  • Write that on the top of the sheet
  • Use the space to draw or name the problem
  • Write a brief description of why you’ve placed it there
  • Continue this until you’ve listed all the problems identified by the group

Outcomes of using this tool

We anticipate that using this tool can enable greater understanding of the problems the group would like to prioritise.

rmP10504932016_DxOPsp

Solution ranking

A way to help the group reach consensus on the solutions to be taken forward, and keep focused on the key issues.

At what stage of the design process is this tool most useful?

Deliver.

What can this tool be used for?

Use this tool in your group to:

  • Gather an overview of the solutions that are most important to the group
  • Narrow solutions down
  • Establish why some solutions are more important than others
  • Enable everyone to have their say

How do you use it?

  1. Use the blank sheet individually to record the solutions the group have identified
  2. Think about what you thought was the most important solution
  3. Write that on the top of the sheet
  4. Use the space to draw or name the solution
  5. Write a brief description of why you’ve placed it there
  6. Continue this until you’ve listed all the solutions identified by the group

Outcomes of using this tool

We anticipate that using this tool can enable greater understanding of the solutions the group would like to prioritise.

rmP10504962016

Priority Matrix

An approach to help narrow down a series of options that are a priority for the whole group. This can be used in conjunction with either the Problem Ranking Tool or the Solution Ranking Tool.

At what stage of the design process is this tool most useful?

Define, Deliver.

What can this tool be used for?

Use this tool in your group to:

  • Gather an overview of problems/solutions that are of high-interest and high-priority for the group
  • Establish which problems/solutions should be taken forward to the next phase of the project
  • Provide a non-verbal way for all members to have a say in which problems/solutions are considered

How do you use it?

  1. As a group discuss the problems/solutions [delete as appropriate] you individually ranked in the last activity.
  2. Write each of the problems/solutions [delete as appropriate] ranked highest by individuals on post-it notes.
  3. Taking time to discuss each problem in detail, vote using your ‘priority cards’ where the problem/solution [delete as appropriate] sits in the matrix.
  4. Place the post-it where the majority of the group thinks it sits in the matrix.
  5. At the end of this activity you will have an overview of the problems/solutions of high-interest and high-priority for the group.

Outcomes of using this tool

We anticipate that using this tool will enable groups to refine prioritised options.

rmP10505022016

Solutions Matrix

A matrix to identify which solution relate to the parameters a group is using to make decisions.

At what stage of the design process is this tool most useful?

Deliver.

What can this tool be used for?

To help a group to work together to discuss the key principles of what a desired solution would look like in practice.

How do you use it?

  • Break the larger group into smaller groups of 3-5 people. Each group should contain a range of people with different experiences (personal and professional).
  • Note taker: Nominate one person to capture the group’s discussion in the worksheet provided. They can write or draw, as long as they capture as much as they can.
  • Facilitator: Nominate one person to keep the group focused on completing the worksheet provided.
  • Provide the group with a prompt sheet which lists the solutions they have identified through previous activities.
  • Using this, the group should work through the questions on the worksheet to provide a detailed overview of what their solution would look like in practice.
  • Each smaller group should present their completed worksheets to the larger group for discussion once completed.

Outcomes of using this tool

We anticipate that using this tool will enable groups to refine prioritised options.

rmP10504852016